Spotify is a popular music streaming service used by millions of people worldwide. While the Spotify desktop app offers a user-friendly interface, some users prefer to customize the app’s look and feel to suit their preferences.
That’s where Spicetify comes in – a third-party tool that allows users to modify the Spotify UI with custom themes and add new features to the app.
In this blog post, we’ll guide you through the process of downloading, installing, and using Spicetify on both Windows and Mac.
In this article
How to Download Spicetify
The first step in customizing your Spotify app with Spicetify is to download the tool.
You can download the latest version of Spicetify from the Official Github Repo at
https://github.com/spicetify/spicetify-cli/releases
Once you’re on the GitHub Release Tab,
click on the “Download ZIP” button to download the Spicetify package to your computer.
How to Install Spicetify
After downloading the Spicetify package, the next step is to install it on your computer. The installation process is slightly different on Windows and Mac, so we’ll cover both methods below.
How to Install Spicetify on Windows
To install Spicetify on Windows, follow these steps:
- Extract the Spicetify ZIP file to a location of your choice.
- Open the extracted folder and copy the path to the “spicetify.exe” file.
- Press the Windows key+ R to open the “Run” dialogue box.
- Type “cmd” in the dialogue box and press Enter to open the Command Prompt.
- In the Command Prompt, type “cd ” (without quotes) followed by the path to the extracted Spicetify folder.
- Press Enter to navigate to the Spicetify folder.
- Type “spicetify” and press Enter to run the Spicetify CLI.
or if you are comfortable you use the simple Command line commands to install the spicetify-cli and spicetify marketplace
Install Spicetify Cli (Powershell)
iwr -useb https://raw.githubusercontent.com/spicetify/spicetify-cli/master/install.ps1 | iexInstall Spicetify Marketplace
iwr -useb https://raw.githubusercontent.com/spicetify/spicetify-marketplace/main/resources/install.ps1 | iexMore ways to install Spicetify on Windows – https://spicetify.app/docs/advanced-usage/installation#windows
How to Install Spicetify on Mac
To install Spicetify on Mac, follow these steps:
- Extract the Spicetify ZIP file to a location of your choice.
- Open Terminal on your Mac.
- In Terminal, type “cd” (without quotes) followed by the path to the extracted Spicetify folder.
- Press Enter to navigate to the Spicetify folder.
- Type “./spicetify” and press Enter to run the Spicetify CLI.
Use the Command line to install spicetify-cli and spicetify marketplace
Install Spicetify Cli (Shell)
curl -fsSL https://raw.githubusercontent.com/spicetify/spicetify-cli/master/install.sh | shInstall Spicetify Marketplace
curl -fsSL https://raw.githubusercontent.com/spicetify/spicetify-marketplace/main/resources/install.sh | shMore ways to install Spicetify on Mac – https://spicetify.app/docs/advanced-usage/installation#linux-and-macos
How to Update Spicetify
Spicetify is constantly updated with new features and bug fixes, so it’s important to keep your installation up-to-date.
To update Spicetify, simply download the latest version from the official Github page and replace the existing Spicetify files on your computer.
How to Use Spicetify
Now that you’ve installed Spicetify on your computer, you can start customizing your Spotify app. The Spicetify CLI provides various commands that you can use to apply custom themes, add new features, and tweak the Spotify UI. Here are some basic Spicetify commands to get you started:
- To apply a custom theme, type “spicetify backup apply” followed by the name of the theme you want to apply.
- To add a new feature, type “spicetify config” followed by the feature’s name and value.
- To reset Spicetify to its default settings, type “spicetify restore”.
How to Run Spicetify
To run Spicetify, simply open the Command Prompt or Terminal
and navigate to the Spicetify folder using the steps we covered earlier, then type “spicetify” and press “Enter” to start the CLI.
Once the CLI is running, you can use the various Spicetify commands to customize your Spotify app as per your requirements.
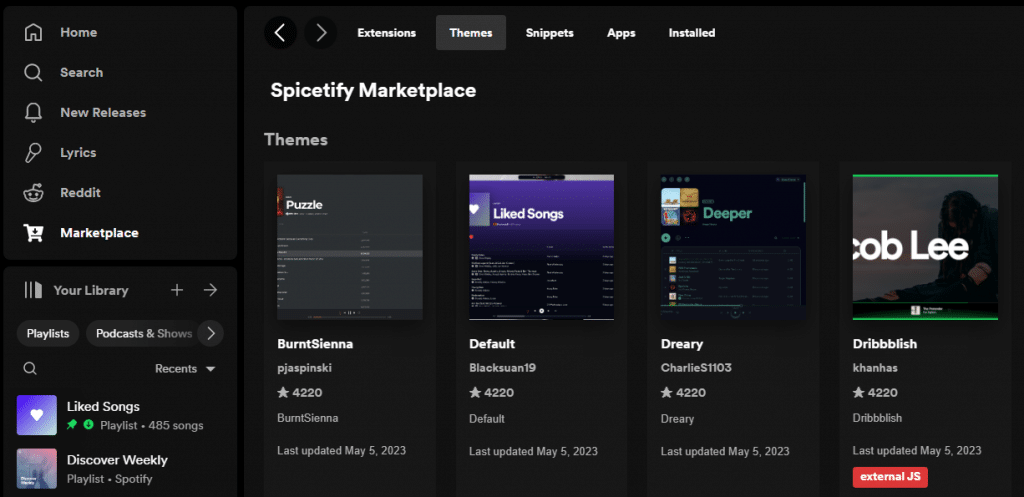
How to Use Spicetify Marketplace
You can use the Spicetify marketplace to install
- Extensions
- Themes
- Snippets
- Apps
- Installed (manage installed extensions and themes)
Spicetify Marketplaces makes installing themes and apps just one click step.

How to Install Spicetify Themes
One of the most popular features of Spicetify is the ability to apply custom themes to the Spotify app.
There are several Spicetify themes available on the official Github page, and you can also create your own themes using CSS and JavaScript.
To install a Spicetify theme, follow these steps:
- Download the theme package from the GitHub page and extract it to a location of your choice.
- Open the extracted folder and copy the name of the theme folder.
- Open the Command Prompt or Terminal and navigate to the Spicetify folder using the steps we covered earlier.
- Type “spicetify config current_theme ” (without quotes) followed by the name of the theme folder you copied earlier.
- Press “Enter” to apply the theme to your Spotify app.
Read 👉 How to See Your Spotify Stats
Conclusion
Spicetify is a powerful tool that allows users to customize the Spotify app according to their preferences. In this blog post, we covered the steps to download, install, and use Spicetify on both Windows and Mac, as well as how to update the tool and install custom themes. With Spicetify, you can take your Spotify app to the next level and make it truly your own.


