Windows OS always gave its users full freedom to customize their PC the way they want.
Rainmeter is one tool that helps you place customizable skins on your desktop, best thing about Rainmeter is that it can work with other Windows utilizes to give you seamless customizations.
Like you can use it to display currently played songs’ names and album art, weather information, media playback control or add some dramatic effects to make your desktop yours.
Everything depends on your creative imagination.
These Rainmeter skins can be used to integrate with the system and online API to get weather details or any other information you want to see on your desktop.
Rainmeter skin is mainly famous for making your desktop lively and personal, which is also full of useful information without hampering your system performance.
Here I will share some of the best Rainmeter skins you can use to create your perfect desktop setup.
In this article
How to Setup Rainmeter
Install Rainmeter
Download Rainmeter first
- From GitHub Release or
- From Rainmeter Website
After installing Rainmeter, you will some default skin automatically loaded on your desktop,
Add Rainmeter Skins to Desktop
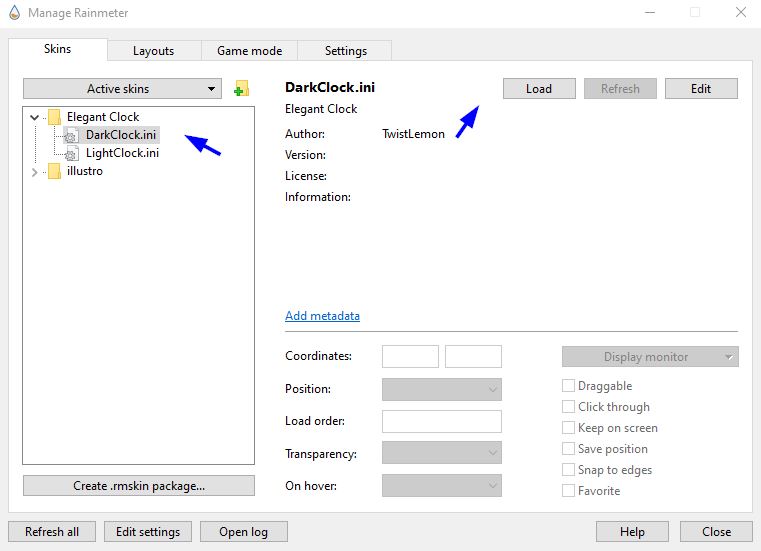
To add any new skin to the desktop,
- Launch Rainmeter
- Select the Skin from the folder
- and tap the “Load” button from the right side
Rainmeter Skins Settings
After the skin is loaded, options at the bottom right side will be enabled to use it.
These options are very important while managing the Rainmeter skins,
- Coordinates: Pixel position where skin should be placed on the screen, these coordinates need to be adjusted when you import other user’s Rainmeter layout because not everyone shares the same desktop resolution.
- Position: By default Rainmeter skins only show up on desktop but using this option you can make skins to always stay up to even above other applications,(On Desktop, Bottom, Normal, Topmost, Stay Topmost)
- Load Order: Allows Rainmeter to decide which skins to load first if multiple skins are in the same position.
- Transparency: Sets the transparency of the skin,
- On Hover: You can use the transparency value set above to apply to the skin on the hover. (Do nothing, Hide, Fade in, Fade out)
- Draggable: If checked you can then drag your skins to anywhere on the screen using your mouse left click.
- Click through: This will make it possible to click on the underlying element of skin if it’s a shortcut or folder.
- Keep on screen:
- Save Position:
- Snap to edges: Easily align
- Favourite: Mark a skin as favourite so you can quickly access it from the menu.
Remove Rainmeter Skins
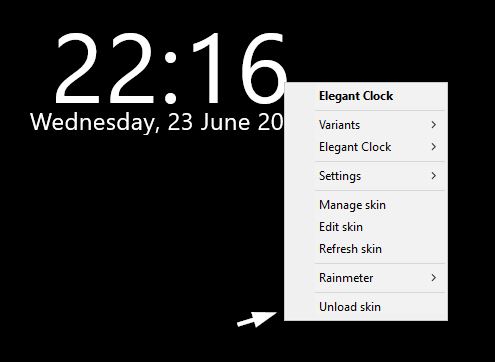
You can remove any skin loaded on the desktop by just right click on the skin and select Unload skin
Make sure to click on the text or any element of skin otherwise, this menu will not open.
Quick Tips to Manage Properly Rainmeter Setups
Do back up your favourite Setups before installing any Rainmeter skin because now and then while trying other skins your setup will be messed up for sure.
By making a backup you can easily restore it to that point easily, You can also include wallpaper in the backup if your setup revolves around that wallpaper,
Create Layouts of setups you like after adjusting all the details the way you like, so that you can easily apply them whenever you like. It’s like making a backup but for each different setup.
Switch between Variants of the skin by right-clicking on active skin and selecting other variations of that skin from there (it will only show other variations if it is available).
Some skins provide different variations of skin like one with more details and one with fewer details only important ones, many Rainmeter skin make will make different variations based on a theme like dark and light them. So do check them out.
Change your Code Editor if you have any other text file editor installed on your system that will make editing .ini files very easy for you, like I have VS code installed so I have set VS Code as my editor, you can use Notepad++ or any other one if you like,
To change this setting just open Rainmeter, go to the Settings tab, and change the Editor from there.
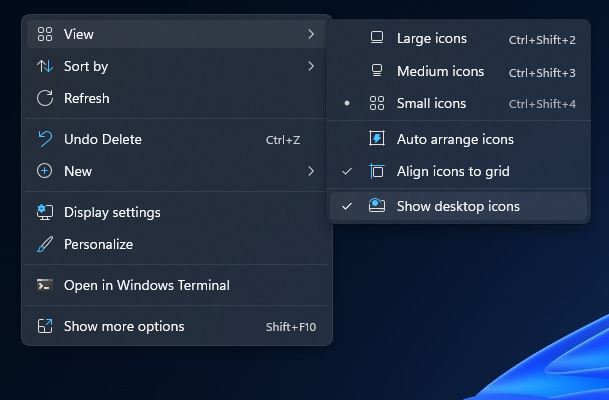
Hide your Desktop Icons, while trying any Rainmeter skin you might find annoying because of lots and lots of shortcuts you created on desktop that are overlapping with skin, or just you don’t want to go through hassle of removing all icons from desktop or organise them in any other folder.
You can just simply hide the icons from desktop without touching any one of them
Right click on desktop’s any empty area > go to view > select Show Desktop Icons
Once that option is unchecked all icons on desktop will be hidden and give you a clean desktop.
Best Rainmeter Skins
Rainmeter skins are made and shared by the community for everyone so you can use some of the best Rainmeter skins created by the community.
You can find every type of Rainmeter skins like minimal, funky, colourful, gaming or futuristic.
Here I am sharing some of the best Rainmeter skins and Rainmeter setups I personally find very cool and interesting.
Things to keep in Mind:
1. Some themes require more time to setup so be ready to spend some time if something is not working,
2. Also some setups are made for different screen resolutions so you need to adjust the placement of widgets to make it look right.
Densa
By ApexXx-SenSei
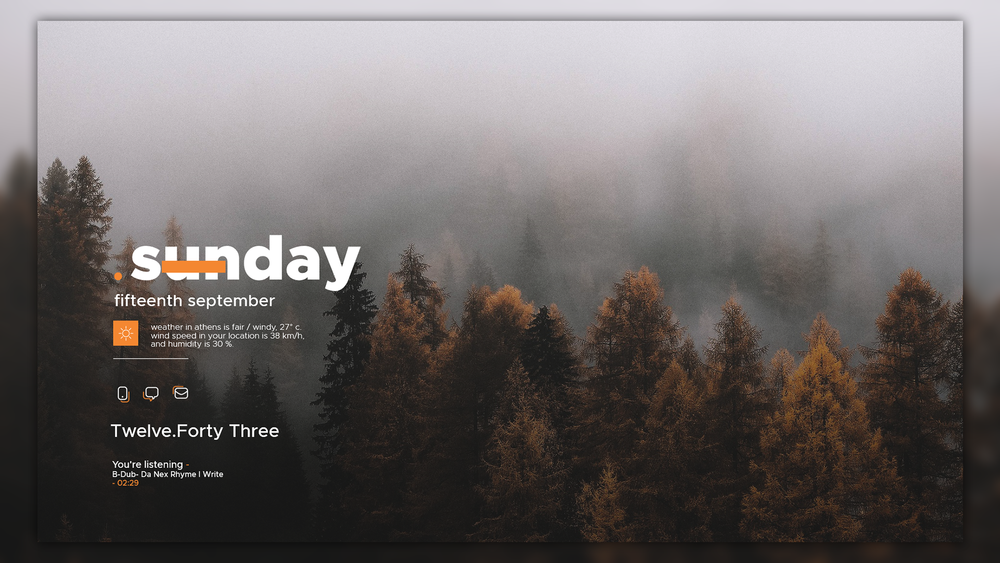
Densa is great rainmeter skin it has very clean look, its center point is the current day.
- Current Day
- Weather with great details (Not Working)
- Some shortcuts
- Current Music information skin
This comes with a handy setting skin also, that makes it easy to edit important things like the music player you use, accent colour
Rento
By ApexXx-SenSei

- Current day, month, date
- Weather (not working)
- Current Music information skin
ValliStart
By JaxOriginals
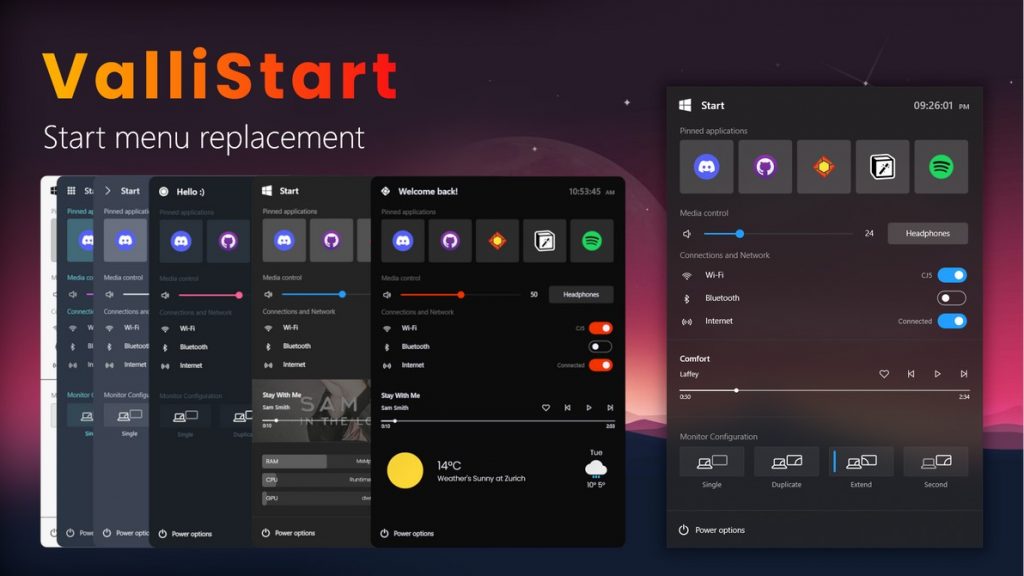
ValliStart is really awesome rainmeter skin that is built with lots of hardwork, UI, and customization options available makes it a proper start menu replacement.
Look and Feel is inspired by Windows 11 with actionable modules that include
- Media player controls,
- Weather details,
- Desktop screen mirror controls,
- Connectivity controls (WiFi, Bluetooth, Internet),
- Top Appl list
Setting up ValliStart maybe feel little difficult if you are first time using JaxOriginals Rainmeter skins,
Follow the steps to get it started,
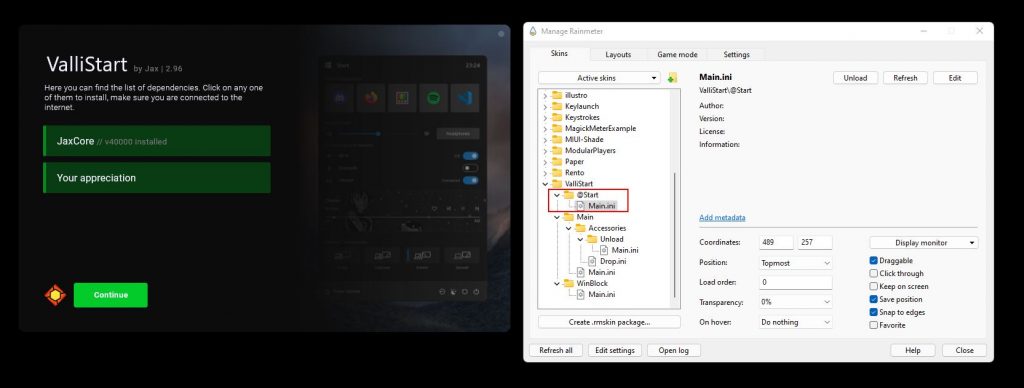
when you install Rainmeter skin by default it will open this start page, but if not then
open Rainmeter and select the Main.ini under folder @Start and load it. It will check for updates and let you install it, In my case skin is up-to-date, So click continue and follow the setup.
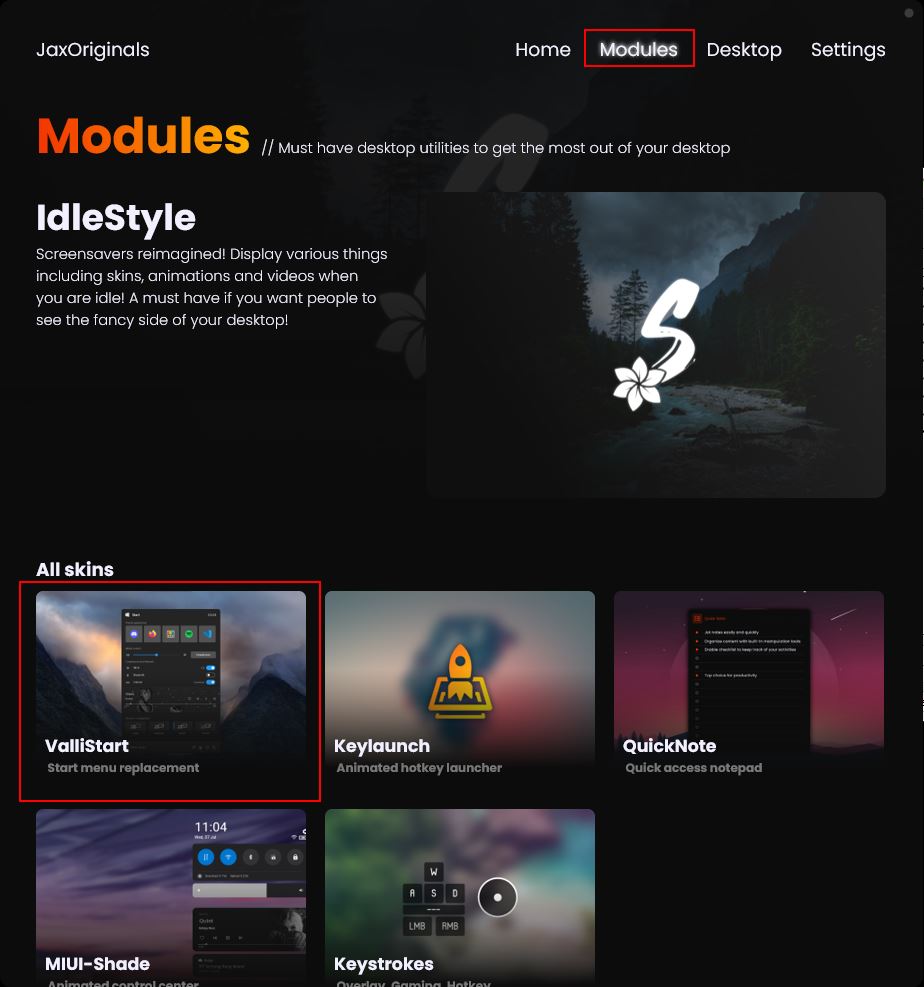
Once you completed the setup will be at the Home page where all JaxOriginals Rainmeter skins are available, from here you can install other skins directly and open settings of existing installed skins,
Select Modules on top and then select ValliStart from all skins.

Activate Skin and Now you can start customizing ValliStart,
In General Tab – Add app shortcuts you like, you can add upto 5 app shortcuts, just browse and select the .exe app or shortcut of app, it will pick the icon from it.
In Appearance Tab – You can almost change all setting related to appearance of the skin like font, color, animation, theme, icon and start menu string.
In Media Tab – Choose your preferred media player you use, that will be used to show details of currently playing songs details and controls.
In Modules Tab – Select the module you want to use on start menu, you can choose up to 3 modules.
For Spotify Media Controls
If you are using Spotify then few more steps are involved to make it work with Rainmeter skin,
Follow the following steps to install spicetify-cli for rainmeter
More ways to install spicetify-cli and to customize your Spotify app read the post, customize Spotify app with spicetify-cli
For Web Media Controls
Install WebNowPlaying Companion if you want to see media controls of browser
ModularPlayers – Adaptive music widget
By JaxOriginals
ModularPlayers comes with lots and lots of media player widgets, you get 11 total widgets,
Like ValliStart install skin and select the ModularPlayers from Desktop tab to load its settings,
First, activate skin and then select the skin of your choice from appearance tab
Based on player style you will get additional customization options below, like changing colors, and scale.
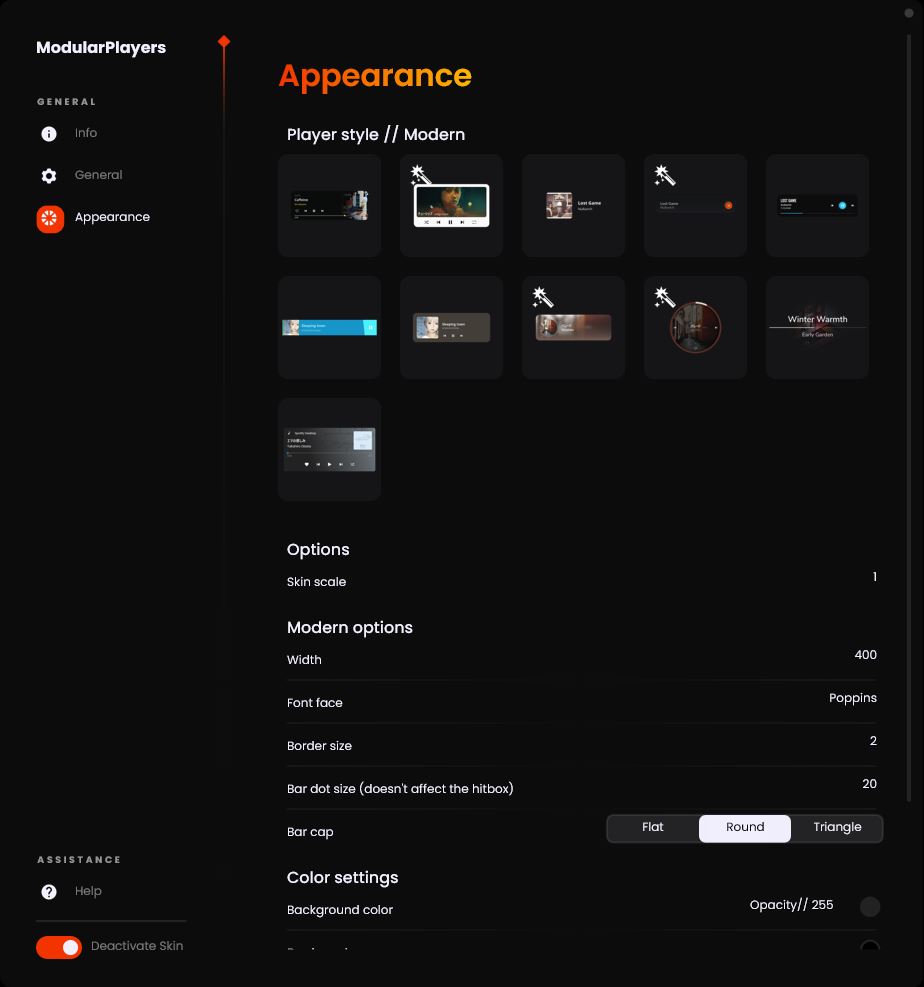
After selecting player it will start showing details of current details of media details from supported media sources,
Just don’t forget to setup Spotify and WebNowPlaying Companion Chrome extensions

IdleStyle – Stylized Screensaver
By JaxOriginals

IdleStyle is a screensaver made with Rainmeter and fully customizable,
This skin provides 8 skin animation styles and
You can also add any of your existing Rainmeter skins, Video, and Image file also.
On top of that, every animation style can be further customized,
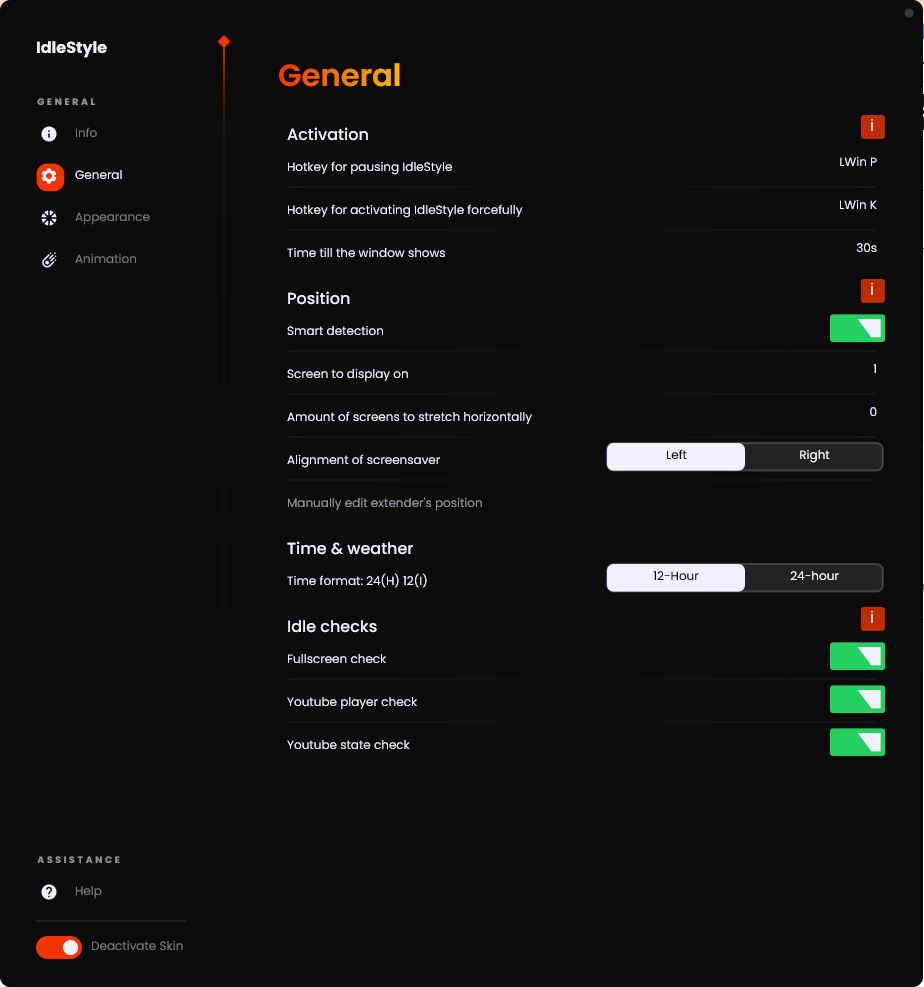
Also don’t forget to change the Idle duration in general tab after which this screen saver should activate.
To test current skin setup just press Left Windows + K and also enable few more settings if not enabled so that your IdleStart doesn’t interfere when you are in full-screen app or when YouTube is playing music.
And Yest IdleStart supports multiscreen setup so do set value in setting according to that.
Keylaunch – Animated hotkey launcher
By JaxOriginals
One more Jem skin created by JaxOriginals,
This one is probably going to be your most used skin because it lets you set custom shortcuts of any app you want to launch,
Not only app you can select anything like an image file, batch file, video, .exe file whatever you like, it will try to launch it.
My favourite animation is Traynotifi and Enlarge, you can select the one you like
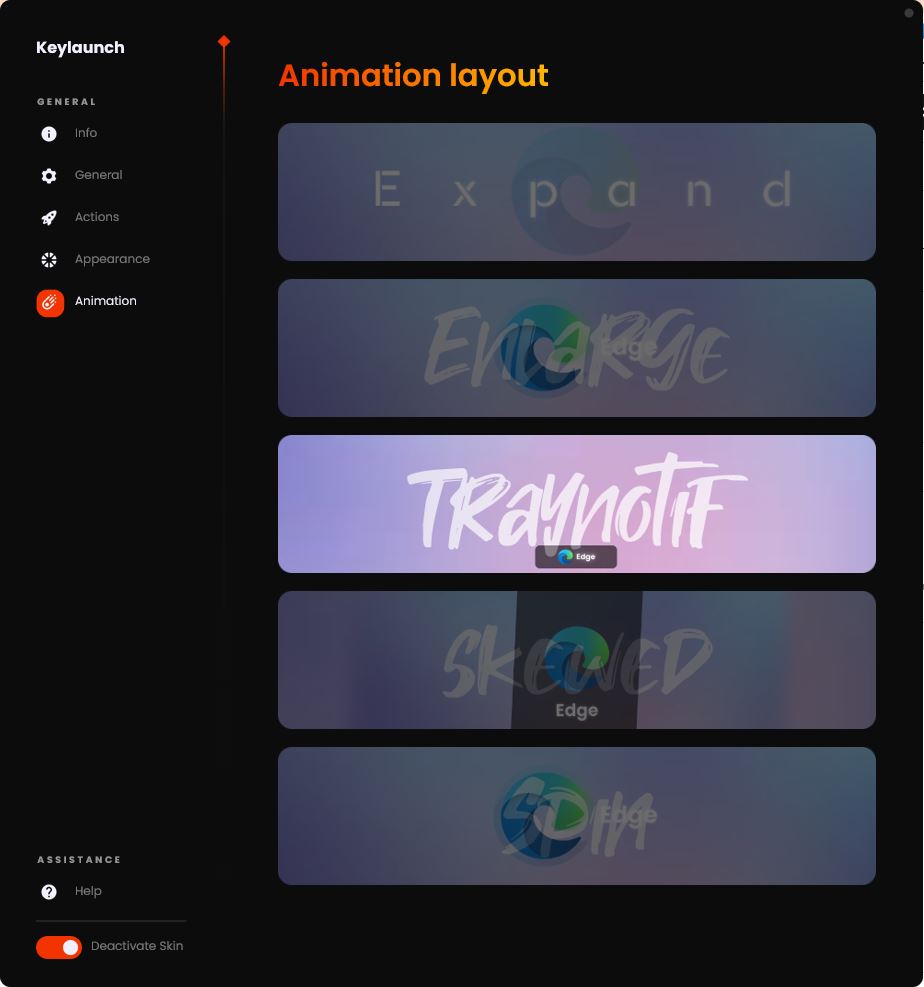
While setting actions and their shortcut, don’t select just any shortcut for action to launch,
Always set it with some combination like Left windows, Ctrl, Shift, Alt so that it won’t mix with other shortcuts.
My suggestion use Shift + any function key that way there is less chance of mixing shortcuts with other applications and it would be easier to manage, if you run out of shortcuts then mix other keys as you like.
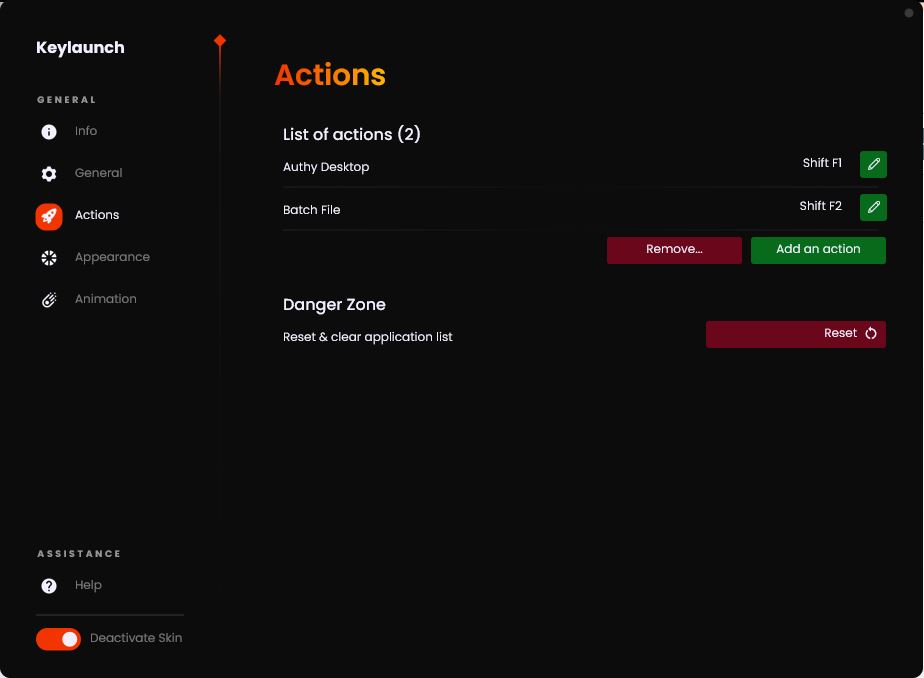
To add new action press the add an action button, it will add new blank action
Now click on pencil icon and select “Quick start” button to select the file you want to open.
Once file is selected, now you can edit the Action,
So just click on name and edit it and press enter to save, Now press “Confirm” button to close the pop up,
Now to assign it to a keyboard shortcut, click on “Edit” next to pencil icon, and now carefully set the shortcut,
For special keys you need to select button below edit area, after special keys selection press the second combination key you want to set,
Once satisfied with shortcut press “Confirm” button to save it.
Note: Do not set shortcut without any special keys combination, like if you set your shortcut to just “A” it will run the action every time your press “A” button or any single letter you set as shortcut.
GameHUB launcher 2
By not-finch
GameHub launcher 2 is one stop best game launcher that can be customized although it will be not that easy because it will require some work from your side to add and edit the list of games.
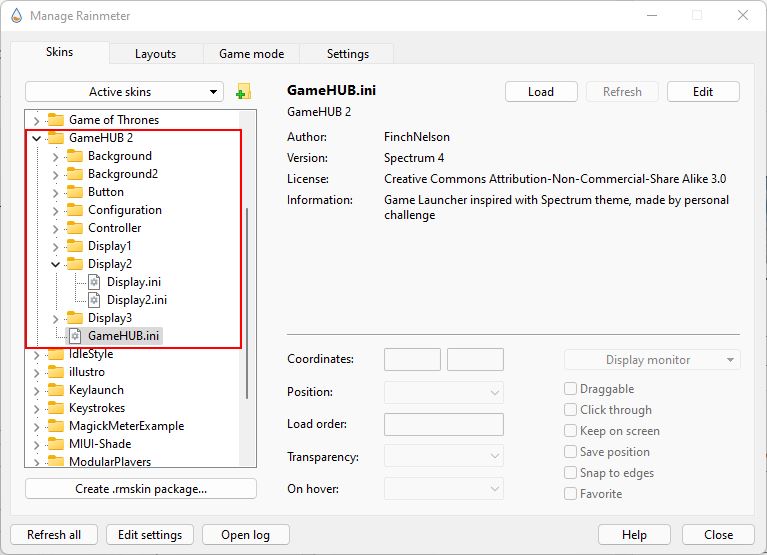
After installing GameHub Launcher try it by loading GameHUB.ini file,
To edit the games list and their icons you need to load .ini files inside Configuration folder of skin, and right click on games you want to change.
Cold / 1.0 By DD-921
By LostSkinsCollection

Cold is really simple but appealing Rainmeter skin,
In this skin not whole lot of going on, Main focus of this setup is a wallpaper that you can get from below links.
Just install the skin and load one by one widgets available in skin and align it according to layout of the wallpaper.
After setting up all widgets you load the settings.ini in cold folder to set location for weather, your language, select media player and also tweak colors if you like.
J.A.R.V.I.S. + S.H.I.E.LD. OS
By yash1331
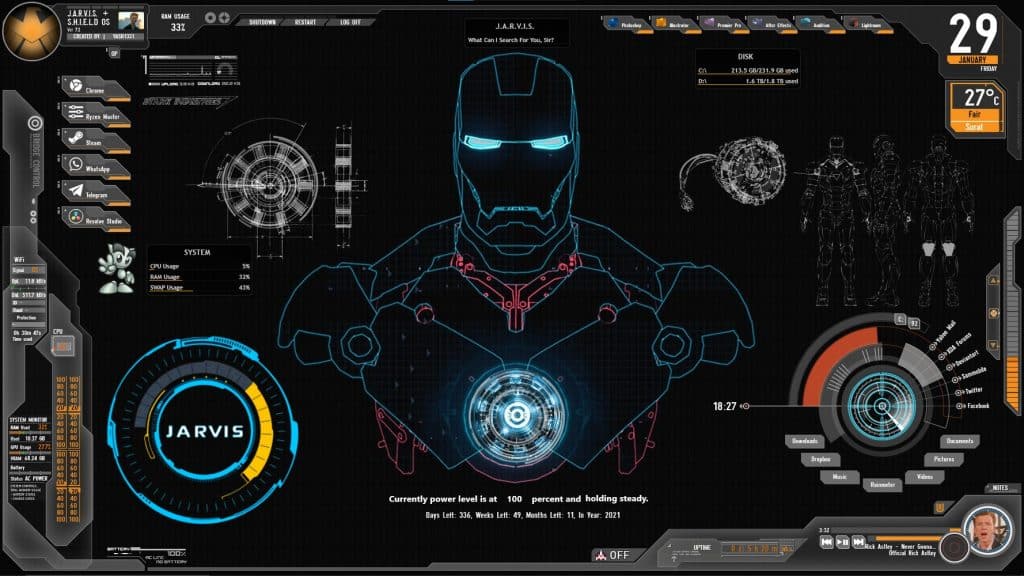
This skin is recommended by author only for desktop resolution 1920×1080, so if your desktop resolution is different then be ready to adjust it,
This skin uses layout option of Rainmeter so after installing this skin open Rainmeter and go to layouts tab,
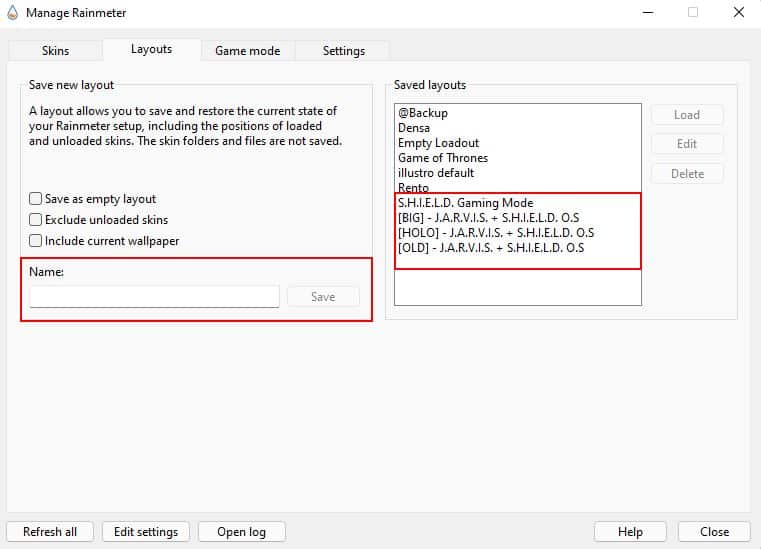
Now first thing you should be doing is to save the current layout from left side, Enter the name and click save.
After making a backup you can now load layout provided by this skin.
P A R A D I S E
By aetheruis

If you love the vibe then this skin is for you, simple yet very awesome looking.
top date and time are bundled together, so you have to align it according to do that.
X2ui v3 – Public Alpha
By digitalrain84
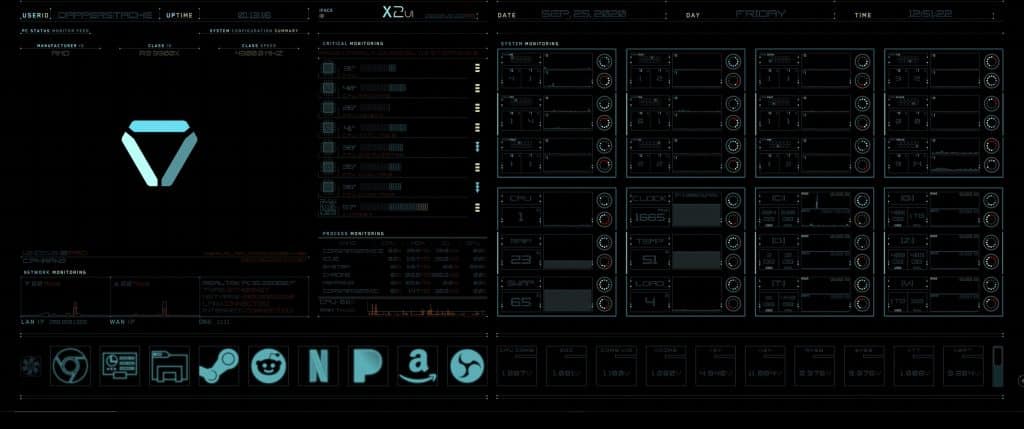
This Rainmeter skin is only for those who love this type of setup with lots and lots of details,
Before downloading this skin few things you should consider,
- Skin is made for UWQUHD, specifically 3440×1440 resolution screen
- Primary CPU details are show based on AMD processor,
This skin is so detailed and adds so much details on your screen, So do backup before installing and running this skin,
The Fizzualizer
By undefinist

This one is my favourite audio visualizer, this skin is pretty straightforward in setting up,
Install it, Load it, and play some music to see it in action,
Only place you will find it difficult with this skin if you don’t like to feeble with the code in .ini file,
To adjust anything in this screen you have to actual open the .ini file in Editor. From there you can edit almost everything about this skin like size of bubbles, colors refresh duration and other things.
Rime
By iroaseta

Skin is based on Rime game that is available on Steam if you want to play it or played it.
Rime skins .rmskin file contains modified MovingMusic and layout only and rest of the files need to be downloaded from Google Drive link provided below,
After downloading files from G Drive, extract and move them to Rainmeter > Skins folder.
MovingMusic – Modified (1 Skin File 1)
Enigma, Fountain of Colors – Modified, Color Flow – Modified (3 Skins in File 2)
Big Sur – RC1
By fediaFedia
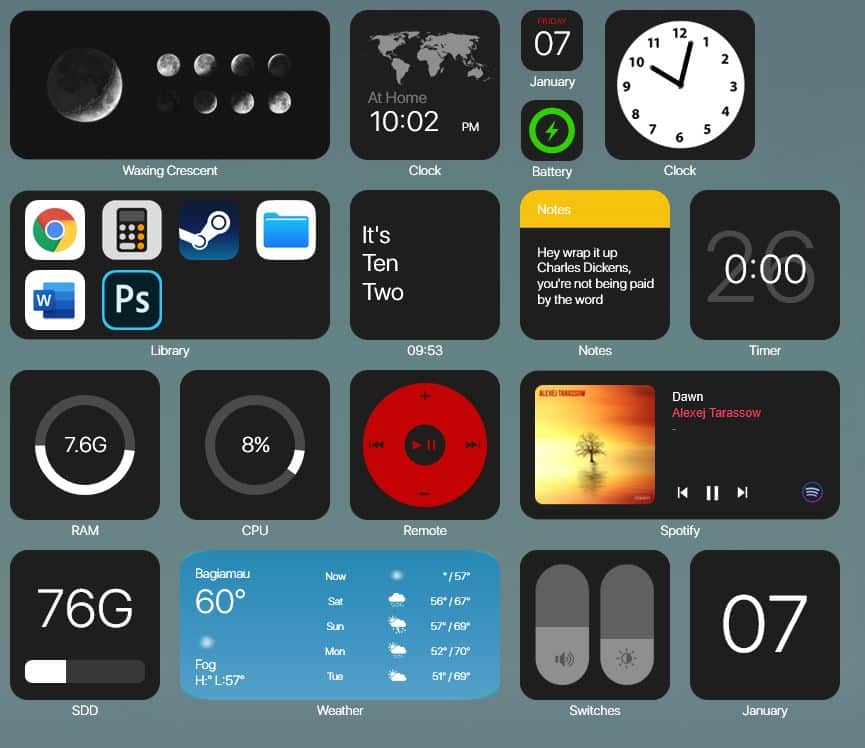
Big Sur is inspired by as it is already cleared by name macOS Big Sur, all widgets carry the look and feel of macOS and come with light and dark variations,
After installing skin, go to layout and load Big Sur layout
Some widgets come with different layouts that make them really stand out,
When grouped together it looks more awesome, don’t forget to add background widget.
Skin also offers lots and lots of websites shortcuts and application shortcuts that you can add to screen with one click.
You can use Big Sur’s Launcher widget to easily add and remove any widget offered by Big Sur,
also you can use the Launcher Toggle to hide and show all widget at once so that Widgets only visible on screen when you want it.
Omnimo
By fediaFedia
Big Sur is latest work of fediaFedia that came out because he is the creator of Omnimo skin,
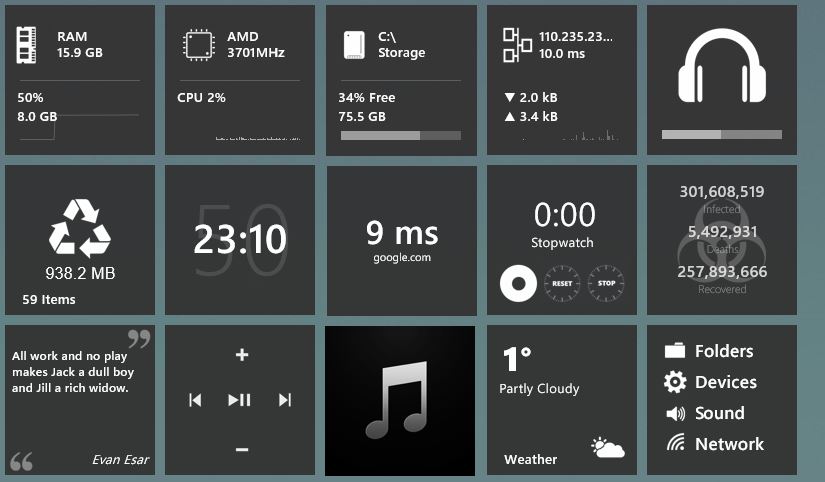
Omnimo skin is wonderful Rainmeter skin that take look and feel from windows 8 and shows widgets in square shapes.
After installing the Omnimo go to layout and load Omnimo layout, that layout comes with the skin. If want to load widgets by yourself them look for skin name WP7 in all skins list.
Omnimo offers many well made skin that comes in multiple shapes, based on their shape info shared by the widgets also adjust that makes the skins look cool and not cluttered.
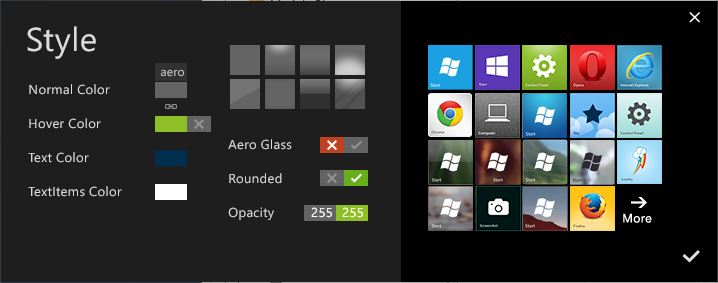
Do check the customizations offered by skin you can change almost everything about skins like background colour, hover colours, text colour, opacity, roundness of widgets and whole lot of things.
Amatical
By ApexXx-SenSei
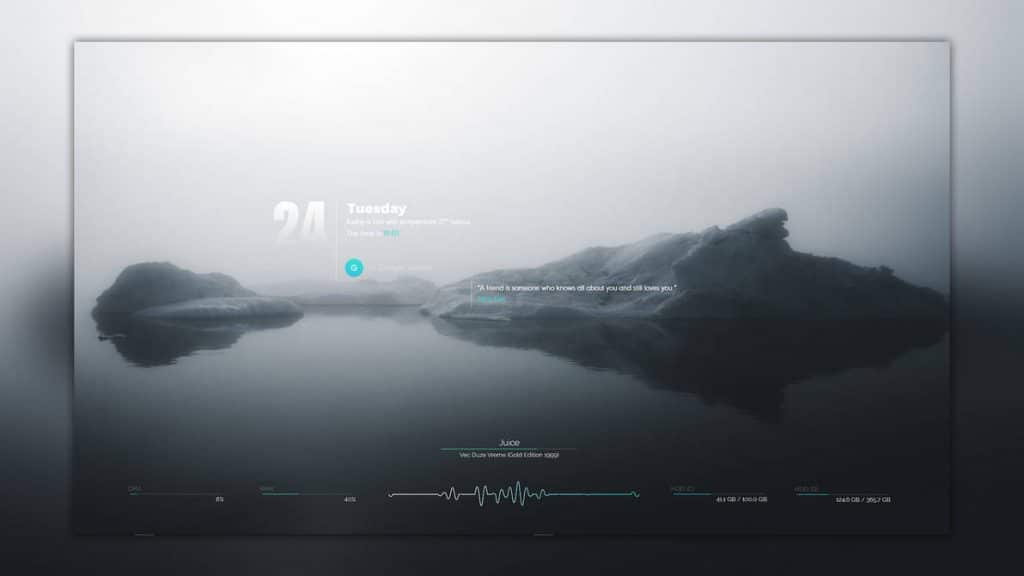
Amatical is simply beautiful, just install the skin and add the widgets one by one and align them as you would like.
To change the basic setting like, colours, clock 24/12, media player of choice load the skin in settings folder or just double click the date and time skin.
WordClock 2
By brbk

WorldClock 2 is a great Rainmeter skin and you will surely love it,
Skin is very great, you can open the editing option of the skin by left clicking on top left square then more options,
It will open up a small popup with list of things you can change right from there, select the one you want to edit and enter the new values.
During test I failed change the colors of the skin.
QuickNote
By JaxOriginals
Another beautiful and working quick note utility made with Rainmeter,
You can easily access it shortcut that is inbuilt with this skin, default shortcut is Windows Key + W that is really useful,
You can quickly edit a todo without touching keyboard, activate the skin using shortcut then press the number key to edit the row on that number.
By default you get 4 todo lists, you can access them after opening todo list then left click on the todo icon to left.
You will find their 4 list with different name, just right click on any of them to rename it.
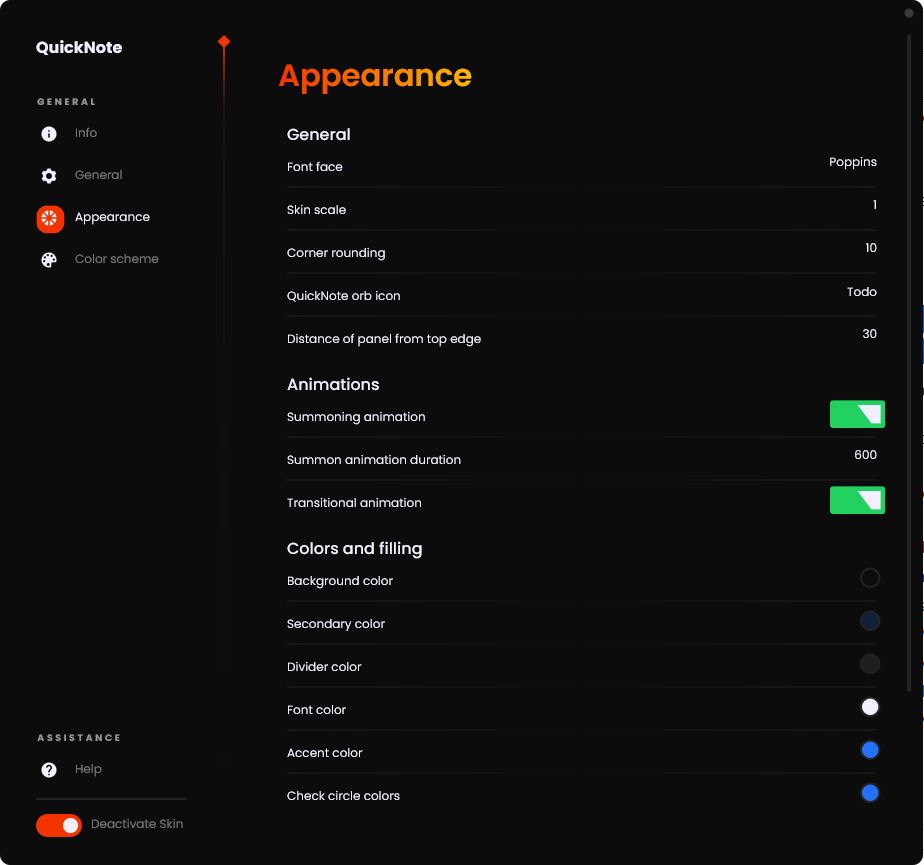
QuickNote offers many customization like other JaxOriginals skins, you can edit font, animation duration, colours, choose from prebuilt skin colors (9 themes), scale the skin as you like.
Oh, Don’t forget to change shortcut if you want it to change it,
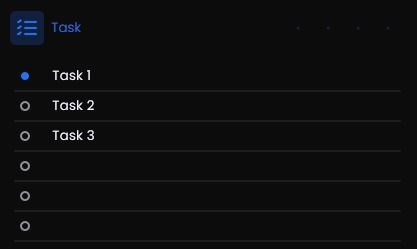
Here is how this skin will look like,
skin has some 4 hidden icons on top right, when you hover over them you will see some icons to add more rows to your todo list and option to remove them, you can also clear all to-dos from current todo with one click.
More popular Rainmeter skins
Here is list of popular Rainmeter skins I thought you should know that and tryout,
If you love any skin do let me know, I will add them in the following list show others can try it out.
- BlueVison 2 by g3xter
- Lumiero by Apexxx-sensei
- Rusty Plates and Pipes a Steampunk HUD by Mordasius
- Retro Enigma by Faulkner16
- Assassin’s Creed Desktop by Ionstorm01
- Minimal by Aidendrew
- Gothic Century by Chaebi69
- Paper::Notes by Haitime
- Super Blood Moon by Keithstoodley
Important Links
- https://docs.rainmeter.net/manual/installing-rainmeter/
- https://www.deviantart.com/search?q=Rainmeter
